Cheatsheet
The shortest path from a log file to an answer, and the habits that make it faster.
Want to try something right away? See the typical tasks, each opens a ready-made session in the hosted app.
First 5 minutes
- Open a log. Drag a file into the window or use Open. Nothing is uploaded.
- Pick the level chips. Click Error or Warn to narrow the Filtered view to those levels.
- Search. Ctrl+F opens the find bar; Ctrl+Enter in it turns the search into a filter.
- Add a filter. Select a node in Files & Filters and press Ctrl+Shift+F; each filter narrows the one above it.
- Jump on the minimap. Click the time line above the log to go to that moment; drag to mark a time window.
Where is what
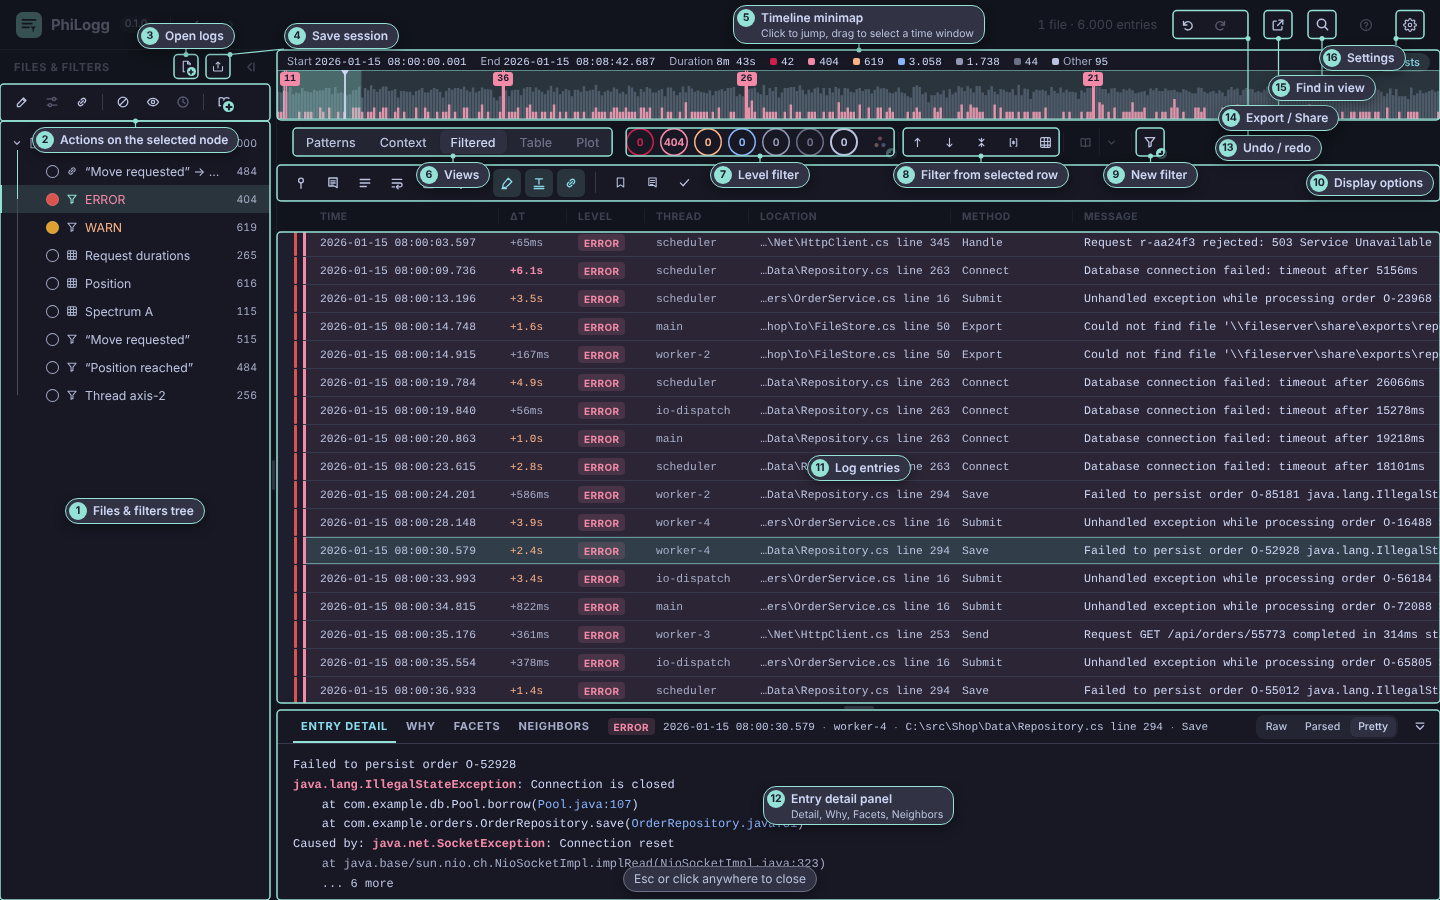
- Files & Filters tree (left): your files and the filter nodes below them. The selected node decides what the views show.
- Level chips and filter buttons (row above the log): a view filter by level, plus the buttons that add filters.
- View tabs: Patterns, Context, Filtered, Table, Plot.
- Log toolbar: find, columns, repeat folding and other view settings.
- Minimap: the whole log as a time line, with zoom and time windows.
- Entry detail panel: the selected row as Raw, Parsed or Pretty.
Best practices
- Start broad, then narrow. Use the level chips first, then add text filters below the node you are on. The tree keeps your steps readable later.
- Turn a view into a node. The level chips are only a view filter. “Add level filter” (the button next to the chips) turns the selection into a node in the tree, so it survives switching nodes and saving.
- Fold spam. “Collapse repeats” (Filtered view) folds consecutive rows into one with a ×N badge. Identical needs equal text; Same pattern also folds rows that differ only in numbers, ids and paths.
- See what led to it. The Context view shows the rows around each hit, with expandable gaps in between. Ctrl+↓ / ↑ steps from hit to hit.
- Measure durations with a link filter. “Link two events…” pairs each start line with its end line (by thread or a captured id); you can then keep only the slow pairs.
- Use the minimap as a time window. Drag on it to mark a window, then press Zoom to look closer or Filter to keep only that window.
- Bookmark and annotate. B bookmarks the selected row, Alt+N adds a note. Both are kept in saved sessions.
- Save your work. “Save session…” stores files, filters, bookmarks and notes in one file you can reopen later or hand to a colleague.
- Ask why a row is there. The Why tab of the bottom panel lists which filter keeps or rejects the selected row.
Keyboard shortcuts
Defaults; most can be changed in Settings → Shortcuts. Tree shortcuts apply while the Files & Filters tree has focus, row shortcuts while the log has.
| Keys | Does |
|---|---|
| Ctrl+F | Find in the current view |
| F3 / Shift+F3 | Next / previous find match |
| Ctrl+1 … 5 | Switch to view tab 1–5 (Patterns first) |
| Ctrl+↓ / ↑ | Context view: next / previous filter match |
| Ctrl+Shift+F | New filter on the selected node |
| Ctrl+E | Edit the selected filter |
| F2 | Rename the selected filter |
| M | Mute / unmute the selected filter |
| Ctrl+C / X / V, Del | Copy, cut, paste, delete a filter |
| ↑ ↓ ← → | Move the selection; in the tree also collapse / expand |
| Enter | Filter selected in the tree: jump to the Filtered view |
| Ctrl+0 | Focus the filter tree |
| Ctrl+B | Collapse / expand Files & Filters |
| Ctrl+J | Collapse / expand Entry Detail |
| B | Bookmark the selected row |
| Alt+N | Add / edit a note on the selected row |
| Ctrl+Shift+C | Copy selected rows for a ticket |
| Ctrl+Z / Ctrl+Shift+Z | Undo / redo |
| ? / F1 | Where is what: label every region of the window |
| Esc | Close the open popup, dialog or panel |